the12volt.com spacer
icon

Resin Mixture & working fg matt size


Post ReplyPost New Topic
< Prev Topic Next Topic >
dornstac 
Member - Posts: 20
Member spacespace
Joined: July 26, 2005
Location: Canada
Posted: July 27, 2005 at 11:59 AM / IP Logged  

I had a post on here earlier, but for some odd reason unknown to me, it was deleted,

I am strugling with the Resin/hardener mixture, it seems that I don't have more than 5 min before the stuff starts to clump up on me making it hard to work with, then theres the case where I didn't add enough and it hasn't hardened over the course of about 8 hrs.......will it ever harden if there is not enough?

also, using pre-torn pieces of mat seems to be the way to go, but I was wondering if I should use as big of pieces as possible for the flat spots and then use small pieces for the corners? does anyone have a good answer for this?

I need a method to be able to work faster so that the resin doesn''t set too fast on me, I want to try and get this mold fixed up this afternoon so please help me out! I will be updating everyone on my lessons learned here soon!

-Respect
oonikfraleyoo 
Gold - Posts: 1,069
Gold spaceThis member has made a donation to the12volt.com. Click here for more info.spacespace
Joined: January 04, 2005
Location: United States
Posted: July 27, 2005 at 1:07 PM / IP Logged  
5 minutes is about right. If you didn't put in enough, it may never harden and even if it does, it may not be very strong.
As far as the mat, 2"x2" squares is what most people suggest. I personally use much bigger than that for large areas on occasion. The bigger you go, the more carefull you have to be. You run into more problems like air bubbles.
Maybe you should think about mxing less resin and doing less at once until you get the feel of things a little better.
Nik
Jeeputer Progress
[|||||||||||-] 90%
Check it out.
realitycheck 
Silver - Posts: 751
Silver spacespace
Joined: September 09, 2004
Posted: July 27, 2005 at 2:34 PM / IP Logged  

Yeah dornstac,

you might even want to try and put a good bit of resin down then have a whole bunch of little pieces already torn off. Take and stick the mat down push it down real good with your fingers and then put more resin on top of it. Ive even put resin down, put the mat on there and then went to the next area and did that same thing. Then went back and coated the fiberglass with more resin after it had almost dried. You can get alot done that way the only problem you have is the little pieces that are sticking straight up will cause you bubbles later.

Learning the trade one fiberglass creation at a time!
dornstac 
Member - Posts: 20
Member spacespace
Joined: July 26, 2005
Location: Canada
Posted: July 27, 2005 at 4:42 PM / IP Logged  

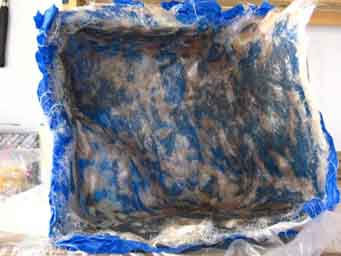
Day 2: Things are going much better now, unfortunately, some of the dammage done cannot be reversed!

I have found that cutting the fg mat works a lot better for me, if I would have started with this I am sure that I would have much less bubbles in my mold, ultimately I should need less layers if I have less bubbles right?

It looks as though the mold is pretty hard in most places, I am going to go over a few sections in an hour or so, I want to let it harden more before I assume that it isn't hard enough yet!

I hope that I have fixed the problem where I didn't mix in enough catalyst by spreading a bit of new resin overtop that had the correct mix, then glassing over it numerous times.

I am going to try and post a pic here, so let me know if I am still screwed or if you think she'll hold up!Resin Mixture &  working fg matt size - Last Post -- posted image.

-Respect
realitycheck 
Silver - Posts: 751
Silver spacespace
Joined: September 09, 2004
Posted: July 28, 2005 at 7:55 AM / IP Logged  
It looks like you got a good mold. I would suggest cutting those bubbles open though and filling them with some resin or something. So that you dont have them cracking. It will be worth time now, to fix it, than finding out later it busts wide open. This is what I did im sure you can get one at walmart.  I took a little syringe, "with no needle of course". I cut a small hole in each of the bubbles. Then I mixed up a batch of resin and sucked up the resin in the syringe and forced it into the bubbles and it filled all the little small cracks and air spaces. It worked pretty good actually.
Learning the trade one fiberglass creation at a time!
dornstac 
Member - Posts: 20
Member spacespace
Joined: July 26, 2005
Location: Canada
Posted: July 28, 2005 at 3:44 PM / IP Logged  

That is an awesome idea man, I was thinking about something along those lines but never put 2 and 2 together

thanks fo rthe suggestion!

-Respect
dornstac 
Member - Posts: 20
Member spacespace
Joined: July 26, 2005
Location: Canada
Posted: July 28, 2005 at 8:34 PM / IP Logged  

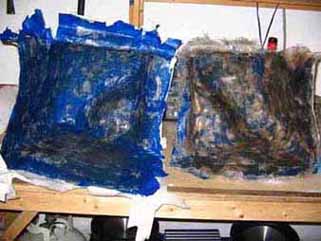
This is how much better I am getting at this stuff

If you can't tell, the pic on the left is the newest addition, I am looking forward to making these things look sexy.

I like to refer to it as giving my car breast implants, thanks for your help so far everyone, I really couldn't and wouldn't do it without the wealth of knowledge on here!

Resin Mixture &  working fg matt size - Last Post -- posted image.

-Respect
realitycheck 
Silver - Posts: 751
Silver spacespace
Joined: September 09, 2004
Posted: July 29, 2005 at 7:17 AM / IP Logged  
Significant improvement there dornstac, if you notice practice really does make perfect. Good job man!
Learning the trade one fiberglass creation at a time!

Sorry, you can NOT post a reply.
This topic is closed.

  Printable version Printable version Post ReplyPost New Topic
You cannot post new topics in this forum
You cannot reply to topics in this forum
You cannot delete your posts in this forum
You cannot edit your posts in this forum
You cannot create polls in this forum
You cannot vote in polls in this forum

  •  
Search the12volt.com
Follow the12volt.com Follow the12volt.com on Facebook
Thursday, October 31, 2024 • Copyright © 1999-2024 the12volt.com, All Rights Reserved Privacy Policy & Use of Cookies
Disclaimer: *All information on this site ( the12volt.com ) is provided "as is" without any warranty of any kind, either expressed or implied, including but not limited to fitness for a particular use. Any user assumes the entire risk as to the accuracy and use of this information. Please verify all wire colors and diagrams before applying any information.

Secured by Sectigo
the12volt.com spacer
Support the12volt.com
Top
the12volt.com spacer