the12volt.com spacer
icon

Flush-mount plexi


Post ReplyPost New Topic
< Prev Topic Next Topic >
coppellstereo 
Silver - Posts: 785
Silver spacespace
Joined: November 21, 2005
Location: United States
Posted: November 30, 2005 at 1:30 AM / IP Logged  

I want to put plexiglass over one of my amps, but I want to mount the plexiglass flush with the box surface.

Can you help me think of ways to do this?

As for now this is the only way I could think to do it. 

Flush-mount plexi - Last Post -- posted image.

menace2sobriety 
Silver - Posts: 394
Silver spacespace
Joined: October 29, 2005
Location: United States
Posted: November 30, 2005 at 2:22 AM / IP Logged  
im not sure if i got your Q? right. but use a router set it for the depth of your plexi-glass. and router parameter you need.
drvnbysound 
Silver - Posts: 289
Silver spacespace
Joined: May 06, 2002
Location: United States
Posted: November 30, 2005 at 8:52 AM / IP Logged  
Im assuming you are meaning.. that you are looking for a way to do it w/o showing the mounting bolts?
coppellstereo 
Silver - Posts: 785
Silver spacespace
Joined: November 21, 2005
Location: United States
Posted: November 30, 2005 at 10:08 AM / IP Logged  

yes, id rather not have the bolts showing.  I understand about the router set to the thickness of the glass, but I cant think how to attach it and carpet/vinyl it.

stevdart 
Platinum - Posts: 5,816
Platinum spaceThis member has made a donation to the12volt.com. Click here for more info.spaceThis member has been recognized as an authority in Mobile Audio and Video. Click here for more info.spaceThis member consistently provides reliable informationspace
Joined: January 24, 2004
Location: Pennsylvania, United States
Posted: December 01, 2005 at 12:04 AM / IP Logged  

A tedious way:  set the glass in and countersink the screws.  Fill with spackle flush with the glass surface.  When you carpet the box, using the double-cutting method for the face of the enclosure...so that all the other sides are carpeted and there is just an inch of overlap onto the face.  This leaves the job of carpeting the face and hiding the edge of the plexiglass under the carpet.  The double-cutting would take place when you meet the front panel of carpet to the overlapped edges.

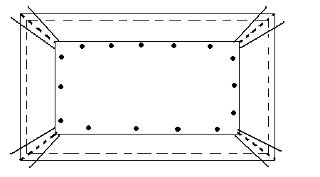
Before the glass is inserted, glue the edge of a pre-measured piece of carpet onto the inside of the opening on each of the four sides.  These pieces will eventually extend out to cover the face of the enclosure.  Now pull these carpet pieces out of the hole.  Each piece would look something like the four sections in this diagram:

Flush-mount plexi - Last Post -- posted image.

The pieces have been precut to be a few inches longer than they need to be to overlap the edges around the perimeter of the box face.  Now, the carpet itself can be glued over the screwholes, following straight lines created with masking tape.  The carpet, face side, is glued onto the plexigass and creased along the tape.  Now the screws are covered.

When that glue sets, fold the carpet onto itself and extend it out to the perimeter edges of the box.  Use glue to stick the folded carpet onto itself and onto the face.  The plexiglass is flush with the box now except for the folded double layer of carpet.  If you take this into account before you use the router, you can make the cut deep enough to include both the thickness of the glass and the thickness of the folded carpet.  This will give you a completely flush appearance.

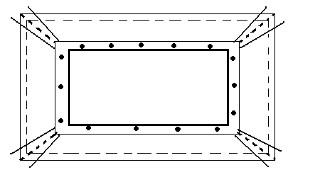
The new dark rectangle in the center represents the edges of the folded carpet covering the screws.

Flush-mount plexi - Last Post -- posted image.

The rest is just doublecutting the carpet pieces into each other, shown where I put dotted lines in the pic.  Every piece is larger than it needs to be and overlaps the adjacent piece.  These overlaps are cut to form a blended carpeted face.  A lot of masking tape and precise work this is.  And I don't know what ever possessed me to go to these lengths to explain my vision!

Build the box so that it performs well in the worst case scenario and, in return, it will reward you at all times.
coppellstereo 
Silver - Posts: 785
Silver spacespace
Joined: November 21, 2005
Location: United States
Posted: December 01, 2005 at 12:46 AM / IP Logged  

that sounds like a good idea!

Even though setting the router to account for the thickness of the folder carpet, this is a lot better than the alternative in my opion! 

What kind of glue would work to glue the carpet to the plexiglass?

Thanks for such a great post!

stevdart 
Platinum - Posts: 5,816
Platinum spaceThis member has made a donation to the12volt.com. Click here for more info.spaceThis member has been recognized as an authority in Mobile Audio and Video. Click here for more info.spaceThis member consistently provides reliable informationspace
Joined: January 24, 2004
Location: Pennsylvania, United States
Posted: December 01, 2005 at 1:10 AM / IP Logged  

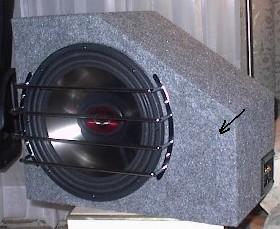
Good, I hope it can help.  You might consider using epoxy for that task, and for the carpet, this type should work well.  A note on that, though:  both sides of the carpet look the same, so you have to be sure to always have the same side facing out.  The pic here shows what happened when I accidentally reversed a piece that I double-cut into the face of this box...

Flush-mount plexi - Last Post -- posted image.

I put the arrow on there to point out the seam, which is not so obvious in real life now.  Hint:  A light coat of white spray paint on one side of the carpet will tell you that it is the back side.

You might also figure out a way to put a steam iron to that crease to get it real tight before it's glued.  3M spray glue works well for carpet-to-carpet and carpet-to-wood.

:::::EDIT:::::  And, now that I think more about this, the router cut can only be exactly the thickness of the glass, because the edge where glass meets box face will be under the carpet.  You will still have the thickness of the carpet...the glass cannot be perfectly flush with it.

Build the box so that it performs well in the worst case scenario and, in return, it will reward you at all times.

Sorry, you can NOT post a reply.
This topic is closed.

  Printable version Printable version Post ReplyPost New Topic
You cannot post new topics in this forum
You cannot reply to topics in this forum
You cannot delete your posts in this forum
You cannot edit your posts in this forum
You cannot create polls in this forum
You cannot vote in polls in this forum

  •  
Search the12volt.com
Follow the12volt.com Follow the12volt.com on Facebook
Thursday, October 31, 2024 • Copyright © 1999-2024 the12volt.com, All Rights Reserved Privacy Policy & Use of Cookies
Disclaimer: *All information on this site ( the12volt.com ) is provided "as is" without any warranty of any kind, either expressed or implied, including but not limited to fitness for a particular use. Any user assumes the entire risk as to the accuracy and use of this information. Please verify all wire colors and diagrams before applying any information.

Secured by Sectigo
the12volt.com spacer
Support the12volt.com
Top
the12volt.com spacer